Saturday, 24 December 2016

Send/receive Multiple Checkboxes Value on Another Page in PHP

Some time we require to populate multiple checkboxes on web page and send these values to another page or save in database. foe example some time we get the list of students from database and take their attendance by just clicking checkboxes for them.

How to create multi select checkboxes? see the example by clicking here.

To create multiple checkboxes use following code

<form id="xyz" action="2.php" method="post" target="">
<input name='rid[]' type='checkbox' class='checkbox' value="1" />
<input name='rid[]' type='checkbox' class='checkbox' value='2' />
<input name='rid[]' type='checkbox' class='checkbox' value='3' />
<input name='rid[]' type='checkbox' class='checkbox' value='4' />
 <input type="submit" name="submit" value="Get Selected Certificates" />
</form>


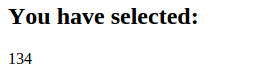
On the another page receive the value of checkboxes using PHP code


        if(!empty($_POST['rid'])) 
        {
                echo "<h2> You have selected: </h2>";
                foreach($_POST['rid'] as $chvalue)
              {
                echo $chvalue;

               }
        }


Thursday, 1 December 2016

How to manage session from login to logout in Java.

An application may begin with some kind of user identification and validation that must be propagated through several other Web pages. Several approaches can be taken to accommodate this need, depending on the requirements of the application. Because the Web server doesn’t remember clients from one request to the next, the only way to maintain a session is for clients to keep track of it.
Without going into details about session concept (you can get it from web), I focus on programming techniques to manage session in web applications.
How to create session?
HttpSession session = req.getSession(true);
Above code will create session on server.
To use class HttpSession, you will have to import package by using code
import javax.servlet.http.*;
How to set session value?
After creation of session, we required to set session value using following code
session.setAttribute("session name", “session value”);
How to print session value?
out.println((String)session.getAttribute("session name"));
How to remove session?
session.removeAttribute("session name");
How to allow to access page content if session is created (means authenticated user is logged in and session is created) and denied if session is not created?
Login example 1 click here
Login example 2 click here

It is a basic requirement of validating authenticated user on every page if he/she has logged in till his/her logged out. You can use following code.
if(session.getAttribute("session name")!=null)
{
// page content if user is valid
}
else
{
out.println("you are not logged in");
}
How to destroy session?
If user want to be logged out from his/her session, you can provide logged out facility to destroy session using code
session.invalidate();


Monday, 28 November 2016

How to authenticate a user (form based login example) in Java and create a session.

Everyone is familiar now days from login. Login is required everywhere when you do some work on web related to you or your account. Many web applications register users and manage their accounts for the security purpose.
I don’t go in details about these. I only focus on how do we authenticate user and create a session for that user in Java. I assume that the reader has the basic knowledge of database and java database connectivity as well as starting a new project to develop.
So prerequisite of this example is:
  1. A working sever for handle java code(preferable Apache tomcat)
  2. A database with user table and has some user list with their passwords ( I have used MYSQL database).
  3. Knowledge of HTML to create login form.
Now first you have to create a login page using HTML, so that users can enter their username and password.
html.html
<form id="form1" method="post" action="login.jsp">
Username<input name="username" type="text" size="35" style="height:30px;" placeholder="Enter Your Username" required />
Password<input name="password" type="password" size="35" style="height:30px;" placeholder="Enter Your Password" required />
<input type="reset" name="Reset" value="Reset" />
<input type="submit" name="Submit2" value="Submit" />
</form>

To authenticate credentials entered by a user we require a java code (written in login.jsp file) to authenticate user from user list table of database.
login.jsp

//Get data from login page

String username=req.getParameter("username");
          String password=req.getParameter("password");
//Database connectivity
Connection conn = null;
          Statement stmt=null;
           String user="";
          String pass="";
          Class.forName("com.mysql.jdbc.Driver");
          conn =           DriverManager.getConnection("jdbc:mysql://localhost:3306/database_name","DB_username","DB_password");
          stmt = conn.createStatement();

//Execute SQL query to search in database to authenticate user
String sql="select username, password, type from users where        username='"+username+"' and password='"+password+"'"
ResultSet rs = stmt.executeQuery(sql);

//If user found in database store his details in variables
if(rs.next())
{
   user=rs.getString(1);
pass=rs.getString(2);
type=rs.getString(3);
}
//If user is valid than create a session and redirect him to his account page.
if(username.equals(user) && pass.equals(password) )
{
HttpSession session = reqest.getSession(true);
session.setAttribute("user", username);
response.sendRedirect("userhome.jsp");
}

//If user is not valid then redirect him to login page
 else
{
response.sendRedirect("login.jsp");
}
//Close database connection.
rs.close();
stmt.close();
conn.close();

The complete java code is
try
{
String username=req.getParameter("username");
String password=req.getParameter("password");
Connection conn = null;
 Statement stmt=null;
String user="";
String pass="";
Class.forName("com.mysql.jdbc.Driver");
conn = DriverManager.getConnection("jdbc:mysql://localhost:3306/databasename","DB_user","DB_password");
stmt = conn.createStatement();
String sql="select username, password, type from users where username='"+username+"' and password='"+password+"'";
ResultSet rs = stmt.executeQuery(sql);
if(rs.next())
{
user=rs.getString(1);
pass=rs.getString(2);
 }
if(username.equals(user) && pass.equals(password) )
{
HttpSession session = request.getSession(true);
session.setAttribute("user", username);
response.sendRedirect("home.jsp");
}
else
{
response.sendRedirect("login.jsp");
}
rs.close();
stmt.close();
conn.close();
 }
catch(Exception e)
{
out.println(e);
 }

Monday, 3 October 2016

Metric units used in computer science

In computer science in general, metric units are used instead of traditional English units (the furlong-stone-fortnight system). The principal metric prefixes are listed below. The prefixes are typically abbreviated by their first letters, with the units greater than 1 capitalized (KB, MB, etc.). One exception (for historical rea-sons) is kbps for kilobits/sec. Thus, a 1-Mbps communication line transmits 10 6 bits/sec and a 100-psec (or 100-ps) clock ticks every 10 −10 seconds. Since milli and micro both begin with the letter ‘‘m,’’ a choice had to be made. Normally, ‘‘m’’ is used for milli and ‘‘μ’’ (the Greek letter mu) is used for micro.

Exp.                                  Explicit                                                                     Prefix

10 −3                                      0.001                                                                            milli
10 −6                                      0.000001                                                                      micro
10−9                                       0.000000001                                                                 nano
10-12                                      0.000000000001                                                          pico
10-15                                      0.000000000000001                                                    femto
10-18                                      0.0000000000000000001                                            atto
10-21                                      0.0000000000000000000001                                      zepto
10-24                                      0.0000000000000000000000001                                yocto


103                                  1,000                                                                            Kilo
10 6                                 1,000,000                                                                     Mega
10 9                                 1,000,000,000                                                              Giga
10 12                                     1,000,000,000,000                                                       Tera
10 15                               1,000,000,000,000,000                                                Peta
10 18                                     1,000,000,000,000,000,000                                         Exa
10 21                                     1,000,000,000,000,000,000,000                                  Zetta
10 24                                     1,000,000,000,000,000,000,000,000                           Yotta


It is also worth pointing out that for measuring memory, disk, file, and data-base sizes, in common industry practice, the units have slightly different mean-ings. There, kilo means 2 10 (1024) rather than 10 3 (1000) because memories are always a power of two. Thus, a 1-KB memory contains 1024 bytes, not 1000 bytes. Note also the capital ‘‘B’’ in that usage to mean ‘‘bytes’’ (units of eight bits), instead of a lowercase ‘‘b’’ that means ‘‘bits.’’ Similarly, a 1-MB memory contains 2 20 (1,048,576) bytes, a 1-GB memory contains 2 30 (1,073,741,824) bytes, and a 1-TB database contains 2 40 (1,099,511,627,776) bytes. However, a 1-kbps communication line transmits 1000 bits per second and a 10-Mbps LAN runs at 10,000,000 bits/sec because these speeds are not powers of two. Unfortunately, many people tend to mix up these two systems, especially for disk sizes. To avoid ambiguity, in this book, we will use the symbols KB, MB, GB, and TB for 2 10 , 2 20 , 2 30 , and 2 40 bytes, respectively, and the symbols kbps, Mbps, Gbps, and Tbps for 10 3 , 10 6 , 10 9 , and 10 12 bits/sec, respectively.


Taken from:- COMPUTER NETWORKS, FIFTH EDITION, ANDREW S. TANENBAUM

Wednesday, 28 September 2016

Shut down all PCs(Windows 7) in LAN using Java from Linux

Shop on Amazon                                                                 Google Apps for Work


I have made a web application that shutdown all PCs in LAN in one click. I am working in a computer lab and shutting down all PCs daily is very irritating for me. So, I decided to develop an application that search all PCs, which are turned on and shut them all.

My environment is:- (prerequisite)
  1. I use Ubuntu 14.04 LTS on my PCs.
  2. All LAN PCs are using windows 7 Operating System.
  3. Java should be installed on server.
Since this application is client-server based, so some setting and software will be required on both side.

1. On client side:-

To shut down PC from remote location you require some registry edit in Windows 7 system.
Open command prompt as administrator and run following command:-

reg add HKLM\SOFTWARE\MICROSOFT\WINDOWS\CURRENTVERSION\POLICIES\SYSTEM /V LocalAccountTokenFilterPolicy /t REG_DWORD /d 1

OR

Open the registry editor by going to Start and typing in regedit. Now navigate to the following key:
HKEY_LOCAL_MACHINE – SOFTWARE – Microsoft – Windows – CurrentVersion – Policies – System
Right-click on System on the left hand side and choose New – DWORD (32-bit) Value.


Now your client machine is ready to shut down remotely.

2. On server side:-

In my case, I am running Ubuntu 14.04 and I have installed Java version “1.8.0_74” of Oracle.

To shut down windows PC from Linux machine, we required to install a package samba-common. We can install this by typing on terminal

sudo apt-get install samba-common

After installing this package run following command to check that everything is working:-

net rpc shutdown -I ipaddress -U username%password

note:- If server is windows machine, you can find the windows command to shutdown a remote PC.

3. A Java program

If remote shutdown is successful after above set up, we require a Java program to make it automatic.

To shut down a single machine, Java code is given below:-

import java.io.*;

String com="net rpc shutdown -I";
String ip="192.168.25.52";
String cred="-U admin%logitech";
String command=com+" " +ip+" "+cred;
try {
Process process = Runtime.getRuntime().exec(command);
System.out.println("the output stream is "+process.getOutputStream());
BufferedReader reader=new BufferedReader( new InputStreamReader(process.getInputStream()));
String s;
while ((s = reader.readLine()) != null){
System.out.println("The inout stream is " + s);
}
} catch (IOException e) {
e.printStackTrace();
}


If you want to shutdown all LAN PCs, code can be:-

try{
String com="net rpc shutdown -I";
String cred="-U admin%logitech";

byte[] ip = {(byte)192, (byte)168, 25, 1}; // for 192.168.0.x addresses and starting ip address
for (int i = 1; i <=5; i++) //this will shut 1 to 5 pcs in ip range, you can limit the loop as many pcs you want to shut
{

ip[3] = (byte)i;
InetAddress address = InetAddress.getByAddress(ip);
String ipad=address.toString().substring(1);
String command=com+" " +ipad+" "+cred;
System.out.println(command);
Process process = Runtime.getRuntime().exec(command);
System.out.println("the output stream is "+process.getOutputStream());
BufferedReader reader=new BufferedReader( new InputStreamReader(process.getInputStream()));
String s;
while ((s = reader.readLine()) != null){
System.out.println("The inout stream is " + s);
}
}

}
catch(Exception e)
{
}


Either you can implement this code on a java program or in JSP/Servlet to shut LAN PCs.

Monday, 19 September 2016

Getting started with Groovy in NetBeans 8.0.1


To start with Groovy in Netbeans IDE, download Netbeans from here . You should check that you have downloaded Netbeans bundle with groovy.

Then you should first check that everything is working in Netbeans by executing a Java program.

Open Netbeans, Click on File  ---
                                                     |
                                                     New File


after clicking new file, it will open a window, the select Groovy from category section and groovy script from File Type and click Next


After clicking next again it will open a new window, put the desired file name and click Finish.
 It will create a new file in you currently open project (in main project)


Now write the desired groovy code on this file and run file by right clicking on this file

def name='arvind'

println "Hello $name!"


See the result in output screen.


 About groovy:-
Apache Groovy is a powerful, optionally typed and dynamic language, with static-typing and static compilation capabilities, for the Java platform aimed at improving developer productivity thanks to a concise, familiar and easy to learn syntax. It integrates smoothly with any Java program, and immediately delivers to your application powerful features, including scripting capabilities, Domain-Specific Language authoring, runtime and compile-time meta-programming and functional programming. (from Groovy website)
Read more about Groovy here.

Wednesday, 14 September 2016

Play audio/video on web page in HTML5

HTML5 has come with great support of playing audio or video file in web page. Before HTML5, you require any plug-in support to play any audio or video.

Now such kind of plug-in are obsolete in new version browsers and it was the part of old browser.

In HTML5 you just have to embed <audio> or <video> element on you webpage to play audio or video file on webpage. This <audio> or <video> element is fully supported by any modern browser.

It is simple to embed in you HTML code.

Browser support for these elements are given below. This table shows the minimum number of version of browser from where these element are supported- means browser version if equals or higher than specified- it will support  <audio> or <video> elements.

For video:-

 For audio:-

Now how we use this element in HTML5 code:-

We just have to put this element at required location in our code.

<video width="320" height="240" controls>
  <source src="location of file/file.mp4" type="video/mp4">
  <source src="location of file/file.ogg" type="video/ogg">

Your browser does not support the video tag.
</video>


<audio controls>
  <source src="location of file/file.ogg" type="audio/ogg">
  <source src="location of file/file.mp3" type="audio/mpeg">
Your browser does not support the audio element.
</audio>


If you want play video or audio automatically on startup, put the controls autoplay in tag e.g.

<audio controls autoplay>

<video width="320" height="240" controls autoplay>

It looks on page like:-

Change image source dynamically on hyperlink

 Changing image source dynamically using JQuery. Here in this example I have created there hyperlink and stored all images in the same folde...