Friday, 24 March 2017

How to add external jar file in your project in Netbeans

Many times when we work on a project, we require third-party API or external jar file for some purpose in our project. And we stuck on how to add these external jar file in project.

Here I tell you how to add external jar file in our project in Netbeans IDE.

Open Netbeans IDE and go to Projects explorer in left pane of your IDE. And right click on your project in which you want to add jar file.

Then go to Properties and click on it.


A dialogue window will open. Again in left of window under Categories heading go to Libraries  click on it and in right of the window you will see Add Jar/Folder button, click this and select you file/jar. It is Done.


Tuesday, 7 March 2017

Applying html tags & CSS on JLabel text in Java Swing.

Generally there is a limitation on JLabel text formatting in swing. We can not apply some formatting in JLabel text.
Like:-

Applying bullets in text.
Write text in new line.
Making any text bold.

and may more you can try.

We can only change size, font and style of text using Netbeans or any IDE. But applying HTML tags in JLabel text, we can do more in text formatting.

Let's see how?

If you are using no IDE then use code like:-

jLabel18.setText("<html>
<p>\n
<ul style=\"list-style-type:square\">\n
<li> Users shall not play computer games on computers unless authorised by an authority.</li>\n
<li> Users shall not interfere or tamper with software configurations or any system data files.</li>\n
<li> Users shall not access or in any way alter another user`s files without authorisation.</li>\n
<li> Users shall not make use of computers to access or copy/playing any computer games, viruses, movies and music for personal use.</li>\n
<li> Do not run programs that continue to execute after you log off.</li>\n
<li><strong> Users must back up (e.g.  on Pen Drive, Mail, Cloud etc) her data after each system use.</strong></li> \n
<li>There is no responsibility of University of the user’s data to be stolen, deleted or modified.</li>\n
<li> Downloading or installing programs on the hard drives is strictly prohibited without permission.</li>\n
<li> Do not use the computer for playing music or watching movies.</li> 
</p>
</html>");

output of this code will be:-

If you are using Netbeans then:-

Right Click on JLabel and Select Properties


In Properties select text


Press ok.

Now it is done.

Thursday, 2 February 2017

How to create a Splash Screen in Java Swing.

Splash screen is window, which is displayed during an application startup. Many programs display such a screen, possibly containing copyright information, resource loading status, etc. Splash screen can not be moved or closed normally. It can only be closed or moved programmatically. Most seen splash screen by java user is Netbeans splash screen.

It is very easy to create a splash screen in java using JWindow.

Here is the complete example.

import javax.swing.*;
import java.awt.*;
public class Splash {
 public static void main(String[] args) {

 // Throw a nice little title page up on the screen first

 showSplash(20000);
 System.exit(0); // replace with application code!
 }
 // A simple little method to show a title screen in the
 // center of the screen for a given amount of time.

 public static void showSplash(int duration) {
JWindow splash = new JWindow();
 JPanel content = (JPanel)splash.getContentPane();

 // set the window's bounds, centering the window

 int width = 240;
 int height = 120;
 Dimension screen = Toolkit.getDefaultToolkit().getScreenSize();
 int x = (screen.width-width)/2;
 int y = (screen.height-height)/2;
 splash.setBounds(x,y,width,height);

 // build the splash screen

 JLabel label = new JLabel(new ImageIcon("picture069.jpg"));
 JLabel copyrt = new JLabel
 ("Copyright 1998, PussinToast Inc.", JLabel.CENTER);
 copyrt.setFont(new Font("Sans-Serif", Font.BOLD, 12));
 content.add(label, BorderLayout.CENTER);
 content.add(copyrt, BorderLayout.SOUTH);
 content.setBorder(BorderFactory.createLineBorder(Color.red, 10));

 // display it

 splash.setVisible(true);

 // Wait a little while, maybe while loading resources

 try { Thread.sleep(duration); } catch (Exception e) {}
 splash.setVisible(false);
 }
}

Monday, 2 January 2017

Send/receive Textbox value on one to another page in JSP

In web applications, programmer has to send textbox data to another page and receive this data on a page to do some operations like display, save, insert in database or do any arithmetic or logical operation on this data.

Now here we will see how we send/receive data in between JSP pages by an example.

page1.jsp

 <form id="" name="" method="post" action="page2.jsp">
<input name="text" type="text"/>
 <input type="submit" name="Submit" value="Send" />
</form>


page2.jsp

<%
String s=request.getParameter("text");
out.println(s);
%>

Saturday, 24 December 2016

Send/receive Multiple Checkboxes Value on Another Page in PHP

Some time we require to populate multiple checkboxes on web page and send these values to another page or save in database. foe example some time we get the list of students from database and take their attendance by just clicking checkboxes for them.

How to create multi select checkboxes? see the example by clicking here.

To create multiple checkboxes use following code

<form id="xyz" action="2.php" method="post" target="">
<input name='rid[]' type='checkbox' class='checkbox' value="1" />
<input name='rid[]' type='checkbox' class='checkbox' value='2' />
<input name='rid[]' type='checkbox' class='checkbox' value='3' />
<input name='rid[]' type='checkbox' class='checkbox' value='4' />
 <input type="submit" name="submit" value="Get Selected Certificates" />
</form>


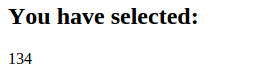
On the another page receive the value of checkboxes using PHP code


        if(!empty($_POST['rid'])) 
        {
                echo "<h2> You have selected: </h2>";
                foreach($_POST['rid'] as $chvalue)
              {
                echo $chvalue;

               }
        }


Thursday, 1 December 2016

How to manage session from login to logout in Java.

An application may begin with some kind of user identification and validation that must be propagated through several other Web pages. Several approaches can be taken to accommodate this need, depending on the requirements of the application. Because the Web server doesn’t remember clients from one request to the next, the only way to maintain a session is for clients to keep track of it.
Without going into details about session concept (you can get it from web), I focus on programming techniques to manage session in web applications.
How to create session?
HttpSession session = req.getSession(true);
Above code will create session on server.
To use class HttpSession, you will have to import package by using code
import javax.servlet.http.*;
How to set session value?
After creation of session, we required to set session value using following code
session.setAttribute("session name", “session value”);
How to print session value?
out.println((String)session.getAttribute("session name"));
How to remove session?
session.removeAttribute("session name");
How to allow to access page content if session is created (means authenticated user is logged in and session is created) and denied if session is not created?
Login example 1 click here
Login example 2 click here

It is a basic requirement of validating authenticated user on every page if he/she has logged in till his/her logged out. You can use following code.
if(session.getAttribute("session name")!=null)
{
// page content if user is valid
}
else
{
out.println("you are not logged in");
}
How to destroy session?
If user want to be logged out from his/her session, you can provide logged out facility to destroy session using code
session.invalidate();


Monday, 28 November 2016

How to authenticate a user (form based login example) in Java and create a session.

Everyone is familiar now days from login. Login is required everywhere when you do some work on web related to you or your account. Many web applications register users and manage their accounts for the security purpose.
I don’t go in details about these. I only focus on how do we authenticate user and create a session for that user in Java. I assume that the reader has the basic knowledge of database and java database connectivity as well as starting a new project to develop.
So prerequisite of this example is:
  1. A working sever for handle java code(preferable Apache tomcat)
  2. A database with user table and has some user list with their passwords ( I have used MYSQL database).
  3. Knowledge of HTML to create login form.
Now first you have to create a login page using HTML, so that users can enter their username and password.
html.html
<form id="form1" method="post" action="login.jsp">
Username<input name="username" type="text" size="35" style="height:30px;" placeholder="Enter Your Username" required />
Password<input name="password" type="password" size="35" style="height:30px;" placeholder="Enter Your Password" required />
<input type="reset" name="Reset" value="Reset" />
<input type="submit" name="Submit2" value="Submit" />
</form>

To authenticate credentials entered by a user we require a java code (written in login.jsp file) to authenticate user from user list table of database.
login.jsp

//Get data from login page

String username=req.getParameter("username");
          String password=req.getParameter("password");
//Database connectivity
Connection conn = null;
          Statement stmt=null;
           String user="";
          String pass="";
          Class.forName("com.mysql.jdbc.Driver");
          conn =           DriverManager.getConnection("jdbc:mysql://localhost:3306/database_name","DB_username","DB_password");
          stmt = conn.createStatement();

//Execute SQL query to search in database to authenticate user
String sql="select username, password, type from users where        username='"+username+"' and password='"+password+"'"
ResultSet rs = stmt.executeQuery(sql);

//If user found in database store his details in variables
if(rs.next())
{
   user=rs.getString(1);
pass=rs.getString(2);
type=rs.getString(3);
}
//If user is valid than create a session and redirect him to his account page.
if(username.equals(user) && pass.equals(password) )
{
HttpSession session = reqest.getSession(true);
session.setAttribute("user", username);
response.sendRedirect("userhome.jsp");
}

//If user is not valid then redirect him to login page
 else
{
response.sendRedirect("login.jsp");
}
//Close database connection.
rs.close();
stmt.close();
conn.close();

The complete java code is
try
{
String username=req.getParameter("username");
String password=req.getParameter("password");
Connection conn = null;
 Statement stmt=null;
String user="";
String pass="";
Class.forName("com.mysql.jdbc.Driver");
conn = DriverManager.getConnection("jdbc:mysql://localhost:3306/databasename","DB_user","DB_password");
stmt = conn.createStatement();
String sql="select username, password, type from users where username='"+username+"' and password='"+password+"'";
ResultSet rs = stmt.executeQuery(sql);
if(rs.next())
{
user=rs.getString(1);
pass=rs.getString(2);
 }
if(username.equals(user) && pass.equals(password) )
{
HttpSession session = request.getSession(true);
session.setAttribute("user", username);
response.sendRedirect("home.jsp");
}
else
{
response.sendRedirect("login.jsp");
}
rs.close();
stmt.close();
conn.close();
 }
catch(Exception e)
{
out.println(e);
 }

Change image source dynamically on hyperlink

 Changing image source dynamically using JQuery. Here in this example I have created there hyperlink and stored all images in the same folde...