Firebase is a mobile platform that helps you quickly develop high-quality apps. Firebase is made up of complementary features that you can mix-and-match to fit your needs including database, with Google Analytics for Firebase at the core.
In this post, I will demonstrate that how to connect you android app to Firebase Database. I also assume that you have enough working knowledge of Android and Android Studio.
Prerequisites-
Now Go to Firebase Console and log in using your gmail id and password and click on Add Project.


1. Register App -
Input package name (e.g com.example.arvindsbi.sbischooldevices;) whatever you have created in Android Studio and then click on Register App.


Go to Firebase database and see your entered data -
(Note:- Sometime you can not see your data in Google Chrome, means it will show blank, if so then change your browser to Mozilla Firefox or Internet Explorer and loging to see your data. I don't why it is so? But I have faced this and resolved like this. )

In this post, I will demonstrate that how to connect you android app to Firebase Database. I also assume that you have enough working knowledge of Android and Android Studio.
Prerequisites-
- Latest Android Studio
- Android Services plugins should be installed in IDE
- Gmail account
Now Go to Firebase Console and log in using your gmail id and password and click on Add Project.

Then give a name of your package and your country here and then Continue.


After clicking on Continue, You will be on Firebase Console. Then select here "Add Firesbase to your Android app" in the centre of page.

A window (Add Firebase to your project) will appear. Here is 3 step process.
1. Register App -
Input package name (e.g com.example.arvindsbi.sbischooldevices;) whatever you have created in Android Studio and then click on Register App.

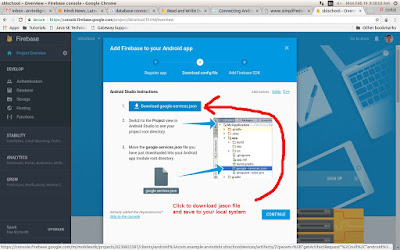
2. Download config file -
Here you will have to download google-services.jason file on your system and click Continue. After downloading, paste this file into your app root directory. (Hero you will find instructions to use it)

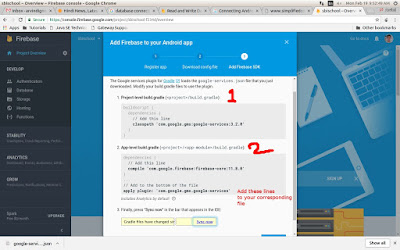
3. Add Firebase SDK -
After downloading and configuring jason file, you will have make some changes in your gradle file. You will have to add some dependencies in your app level and project level build.gradle file (as instructed by Firebase).


Now in app level build.gradle file, add the following line in dependencies -
compile com.google.firebase:firebase-core:11.8.0'
Sometimes this line also required
compile 'com.firebase:firebase-client-android:2.5.0'
Now in project level build.gradle file, add the foolowing dependencies -classpath 'com.google.gms:google-services:3.2.0'After updating your both gradle file click on sync now.After doing all these things your app is now prepared for connectivity with Firebase database.Now you require Java code and xml code to make connectivity.Important- It should be assured that Android Support should be installed in Android Studio.


To check or install Android Support Go to
Tools ===>> Android ===>> SDK Manager then select Plugins in left pane and then tick Android
Support in center pane if not cheked

Here is the full code of both files -Xml code -<?xml version="1.0" encoding="utf-8"?> <RelativeLayout xmlns:android="http://schemas.android.com/apk/res/android" xmlns:app="http://schemas.android.com/apk/res-auto" xmlns:tools="http://schemas.android.com/tools" android:layout_width="match_parent" android:layout_height="match_parent" tools:context="com.example.arvindsbi.sbischooldevices.FirebaseDemo"> <EditText android:id="@+id/myname" android:layout_width="wrap_content" android:layout_height="wrap_content" android:layout_alignParentEnd="true" android:layout_alignParentRight="true" android:layout_alignParentTop="true" android:layout_marginEnd="72dp" android:layout_marginRight="72dp" android:layout_marginTop="64dp" android:ems="10" android:inputType="textPersonName" android:hint="Name" tools:layout_editor_absoluteX="84dp" tools:layout_editor_absoluteY="44dp" /> <EditText android:id="@+id/myage" android:layout_width="wrap_content" android:layout_height="wrap_content" android:layout_alignLeft="@+id/myname" android:layout_alignStart="@+id/myname" android:layout_below="@+id/myname" android:layout_marginTop="43dp" android:ems="10" android:hint="Age" android:inputType="textPersonName" /> <Button android:id="@+id/button13" android:layout_width="wrap_content" android:layout_height="wrap_content" android:layout_alignLeft="@+id/myage" android:layout_alignStart="@+id/myage" android:layout_below="@+id/myage" android:layout_marginLeft="36dp" android:layout_marginStart="36dp" android:layout_marginTop="58dp" android:text="Add to Firebase" /> </RelativeLayout>In Java file you required -1. import com.firebase.client.Firebase;2. Then declare Firbase classpublic Firebase fb;3. In onCreate method initialise the Firebase and connect using URLFirebase.setAndroidContext(this);fb=new Firebase("https://sbxxxxx-fxxxx.firebaseio.com/");4. In onClick methodFirebase nameChild=fb.child("Name");nameChild.setValue(myname.getText()+"");Firebase ageChild=fb.child("Age");ageChild.setValue(myage.getText()+"");Here is full Java code -import android.os.Bundle; import android.support.v7.app.AppCompatActivity; import android.view.View; import android.widget.Button; import android.widget.EditText; import android.widget.Toast; import com.firebase.client.Firebase; public class FirebaseDemo extends AppCompatActivity { public EditText myname,myage; private Button mybutton; public Firebase fb; @Override protected void onCreate(Bundle savedInstanceState) { super.onCreate(savedInstanceState); setContentView(R.layout.activity_firebase_demo); Firebase.setAndroidContext(this); fb=new Firebase("https://sbixxxxxl-fxxxx.firebaseio.com/"); mybutton=(Button)findViewById(R.id.button13); myname=(EditText) findViewById(R.id.myname); myage=(EditText) findViewById(R.id.myage); mybutton.setOnClickListener(new View.OnClickListener() { @Override public void onClick(View view) { Firebase nameChild=fb.child("Name"); nameChild.setValue(myname.getText()+""); Firebase ageChild=fb.child("Age"); ageChild.setValue(myage.getText()+""); Toast.makeText(getBaseContext(),"Details Added",Toast.LENGTH_SHORT).show(); } }); } }After doing all these things don't forget to give internet permission to AndroidManifest.xml file<uses-permission android:name="android.permission.INTERNET"/>

Now run your app enter data -

(Note:- Sometime you can not see your data in Google Chrome, means it will show blank, if so then change your browser to Mozilla Firefox or Internet Explorer and loging to see your data. I don't why it is so? But I have faced this and resolved like this. )

Quick Look up -
- Firebase account login
- Add project
- Add your project package
- Download config file
- Paste this file in your app root directory
- Change in both app level and project level build.gradle file
- Check android support plugins
- Write code in your project
- Give internet permission to your project
- Run project
- See the data in Firebase


